How To Remove Black Dotted Line In Word
Place your cursor into the paragraph immediately preceding the line. On the Home tab click the arrow next to the Borders and Shading button and click No Border.

Remove Black Dotted Lines Format Borders Settings Manuscripts Microsoft Word 2007 Youtube
And the selected horizontal line will be deleted at once.

How to remove black dotted line in word. 2Click on the Home tab at the top of your screen. In doing so the line converted itself into a dotted line of bold black squares extending the entire width of the pages. In these instances there are three ways you can handle the situation.
Under Drawing Tools on the Format tab in the Shape Styles group click the arrow next to Shape Outline and then click the color that you want. To remove the line place the cursor in the paragraph just above where the line was added. You can undo this by immediately pressing CtrlZ.
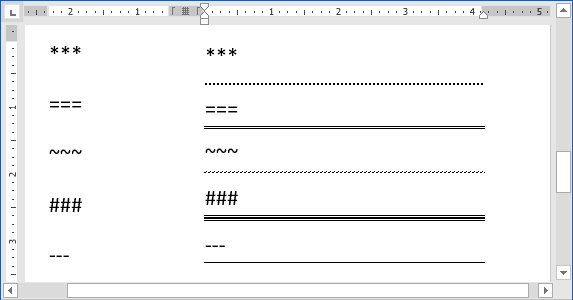
If you type three or more hyphens in Word you often get a black line going all the way across the page. Click the line to select it. On the Home tab of the Ribbon click the button to display paragraph marks s.
If you cant select a line to delete it might actually be a horizontal line which is a type of border. In this video I show you how to remove that big black line that automatically forms in Word when you press enter after an underscore. Place the cursor immediately above the horizontal line.
Select the paragraph mark above the line you want to delete. First remember that the line added by Word is really a paragraph border. Release the Shift key to add a solid line to the document.
Word menu Preferences - View then clear the check from the box for Text boundaries. The line extends to. The selected accent displays over the small dotted box in the equation object.
Click on the Page Borders item in the Page Background group of Design tab. Click inside the Word document and drag the cursor to make the line. In the document you will remove its footnote or endnotes separator line click View Draft.
When you press Enter at the end of the characters that Word replaces with the line Word removes the characters and adds a bottom border to the paragraph just above the one where you typed the characters. I have created a nine page document in Word 13. Click Borders tab click None click OK.
Scroll through the Shape Styles section and click one of the dashed line options. Type your text into the dotted box. Put the cursor above the line.
Second you need to display Words non-printing characters. 1Click to place your cursor above the line. Remove a horizontal line.
First you can press CtrlZ right after you pressed Enter and Word added the line. Make sure the Home tab is active. The gridlines now display on the table.
Go to Format Borders and Shading Word 2002-2003 or click the Border drop-down in the Paragraph section of the Home tab of the Ribbon Word 2007 and up Click None or No Borders to turn off all the borders. In this case the line is removed and your characters remain. If you later want to delete the line there are two things you can do that will help you.
Deleting Dotted Lines in Word. If you do not see the Drawing Tools or Format tabs make sure that you have selected the line. Click the Layout table under Table Tools.
It is not a real line. For more on how lines work in borders see Add change or delete borders from documents or pictures. This should work for m.
In other instances you might have really wanted the characters in your document not the line that Word thought you wanted. In the Table section of the Layout tab click View Gridlines. Example of the Shape Styles group on the Format tab.
If you just want to remove few horizontal lines you can manually remove them as follows. Heres how to get rid of them. To turn off the gridlines for the table simply select the table and click View Gridlines again.
To get rid of it. OS is Windows 10 While editing I intended to draw a dividing line in the pages consisting of several asterisks. To enter your text click on the dotted box to select it.
If there are both footnotes and endnotes in your document a Show Notes dialog box will pop up please select an option as you need and then click the OK button. Jul 11 2017 The Overbar produces a slightly longer line above the text than the Bar. A new orange Drawing Tools tab along with a corresponding ribbon opens at the top of the screen.
In the Paragraph section of the Home Tab click the Borders and. Then click References Show Notes as below screenshot shown. 3Click on the drop-down arrow next to the Borders button toward the middle of the Ribbon in the Paragraph group.
How To Add A Dotted Line In A Microsoft Word Document
Microsoft Word 2010 Black Dotted Line Across The Page Microsoft Community


How To Remove Dotted Line In Open Office Table Of Contents Youtube

How To Add A Dotted Line In A Microsoft Word Document
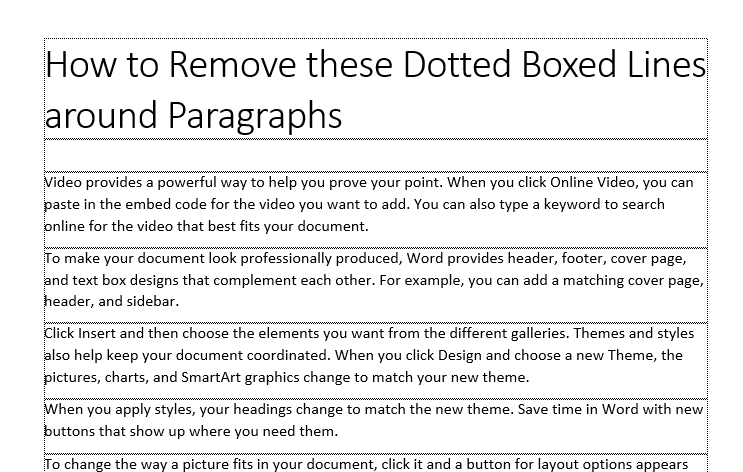
Remove Dotted Line Boxes Around Paragraphs In Word Journey Bytes

How To Remove The Horizontal Line In The Page Header Of Word My Microsoft Office Tips
How To Add And Remove Horizontal Lines Between Sections Of The Document Microsoft Word 2016

How To Add A Dotted Line In A Microsoft Word Document

How To Remove Automatic Horizontal Lines In Word
Post a Comment for "How To Remove Black Dotted Line In Word"